Over the years Embedded Android has evolved into a much better Alternative. Here in this post, I want to share the basic steps to start building an AOSP project from scratch. This will later help if someone wants to build/port a custom Embedded Android stack for a particular hardware
Here I will be sharing how I downloaded Android AOSP sources and built an AOSP image for a Nexus 7 [2012] device. You can follow this approach to build AOSP images for your devices, for example, Nexus 5. So Let’s Start.

Device Information
The Tablet device used here is the Nexus 7 (2012)
Product Name : grouper
Variant: grouper
HW version: ER3
Bootloader Version: 4.23
Environment Setup
>install some required packages
ayx@ayx-HP:~$ sudo apt-get install git-core gnupg flex bison gperf build-essential zip curl zlib1g-dev gcc-multilib g++-multilib libc6-dev-i386 lib32ncurses5-dev x11proto-core-dev libx11-dev lib32z-dev ccache libgl1-mesa-dev libxml2-utils xsltproc unzip |
ayx@ayx-HP:~/$ sudo apt-get install ncurses-dev |
> install adb tool
ayx@ayx-HP:~/$ sudo apt-get install android-tools-adb |
> Fix Udev permission error
ayx@ayx-HP:~$ lsusb
check the vendor id left of the colon, e.g nexus 5
Open this file
ayx@ayx-HP:~$ sudo gedit /etc/udev/rules.d/51-android.rules
Put the following at the bottom of the file and save
# Nexus 5 Google Inc
SUBSYSTEM=="usb", ATTR{idVendor}=="18d1", MODE="0666", GROUP="plugdev" |
ayx@ayx-HP:~$ sudo chmod a+r /etc/udev/rules.d/51-android.rules
ayx@ayx-HP:~$ sudo service udev restart
ayx@ayx-HP:~$ fastboot -l devices
ayx@ayx-HP:~$ sudo service udev restart
ayx@ayx-HP:~$ sudo udevadm control --reload-rules
ayx@ayx-HP:~$ sudo udevadm trigger
ayx@ayx-HP:~$ fastboot -l devices |
> install Java 7
ayx@ayx-HP:~$sudo apt-get install -f
ayx@ayx-HP:~$sudo add-apt-repository ppa:openjdk-r/ppa
ayx@ayx-HP:~$sudo apt-get update
ayx@ayx-HP:~$sudo apt-get install openjdk-7-jre |
select java 7 for the followings
ayx@ayx-HP:~$ sudo update-alternatives --config javac
ayx@ayx-HP:~/$ sudo update-alternatives --config java
ayx@ayx-HP:~/$ sudo update-alternatives --config javap |
> Check versions of the following
In my cases, these were the versions
gcc | 5.4 |
Python | 2.7 |
make | 4.1 |
git | 2.7.4 |
javac | 7 |
java | 7 |
> install repo tool
ayx@ayx-HP:~/$ mkdir ~/bin
ayx@ayx-HP:~/$ PATH=~/bin:$PATH
ayx@ayx-HP:~/$ curl https://storage.googleapis.com/git-repo-downloads/repo > ~/bin/repo
ayx@ayx-HP:~/$ chmod a+x ~/bin/repo |
Download AOSP sources & Build Image
> Download The Source
ayx@ayx-HP:~$mkdir ~/aosp_work
ayx@ayx-HP:~$ cd aosp_work/
ayx@ayx-HP:~/aosp_work$ ulimit -S -n 1024 |
> Configure Git account
Replace “ ” marked text with yours
ayx@ayx-HP:~$git config --global user.name "your_user_name"
ayx@ayx-HP:~$git config --global user.email "your_mail" |
> checkout Lollipop
ayx@ayx-HP:~/aosp_work$ repo init -u https://android.googlesource.com/platform/manifest -b android-5.1.1_r1 |
ayx@ayx-HP:~/aosp_work$ repo sync -j4 |
Wait for the sources to be downloaded
> Find your Device variant
ayx@ayx-HP:~/aosp_work$sudo adb devices
ayx@ayx-HP:~/aosp_work$sudo adb reboot-bootloader
ayx@ayx-HP:~/aosp_work$sudo fastboot oem unlock |
Now in the FASTBOOT bootloader Mode, you will see the VARIANT and other device-related info printed, take note of those. THIS IS THE MOST IMPORTANT THING TO NOTICE
> Download The Device binaries
then go to https://developers.google.com/android/drivers And download the latest binaries for your variant, e.g. for GROUPER variant considering the OS version you want to build. Take note of the branch
extract the binaries to the root of the source tree. For our case into the “aosp_work” folder. Then extract them
> extract the binaries [press ENTER then Space then type I ACCEPT to accept license]
ayx@ayx-HP:~/aosp_work$ ./extract-asus-grouper.sh
ayx@ayx-HP:~/aosp_work$ ./extract-broadcom-grouper.sh
ayx@ayx-HP:~/aosp_work$ ./extract-elan-grouper.sh
ayx@ayx-HP:~/aosp_work$ ./extract-invensense-grouper.sh
ayx@ayx-HP:~/aosp_work$ ./extract-nvidia-grouper.sh
ayx@ayx-HP:~/aosp_work$ ./extract-nxp-grouper.sh
ayx@ayx-HP:~/aosp_work$ ./extract-widevine-grouper.sh |
> setup cache for faster build
ayx@ayx-HP:~/aosp_work$ export USE_CCACHE=1
ayx@ayx-HP:~/aosp_work$ prebuilts/misc/linux-x86/ccache/ccache -M 100G
ayx@ayx-HP:~/aosp_work$ echo 'export USE_CCACHE=1' >> ~/.bashrc
ayx@ayx-HP:~/aosp_work$ . ~/.bashrc |
> clean up
ayx@ayx-HP:~/aosp_work$ make clean
ayx@ayx-HP:~/aosp_work$ make clobber |
>Apply Patches
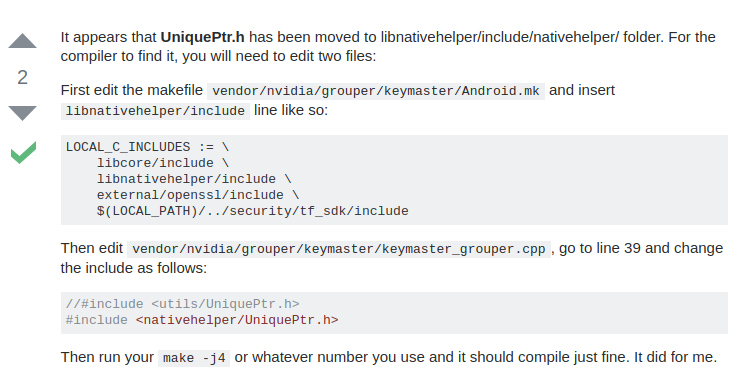
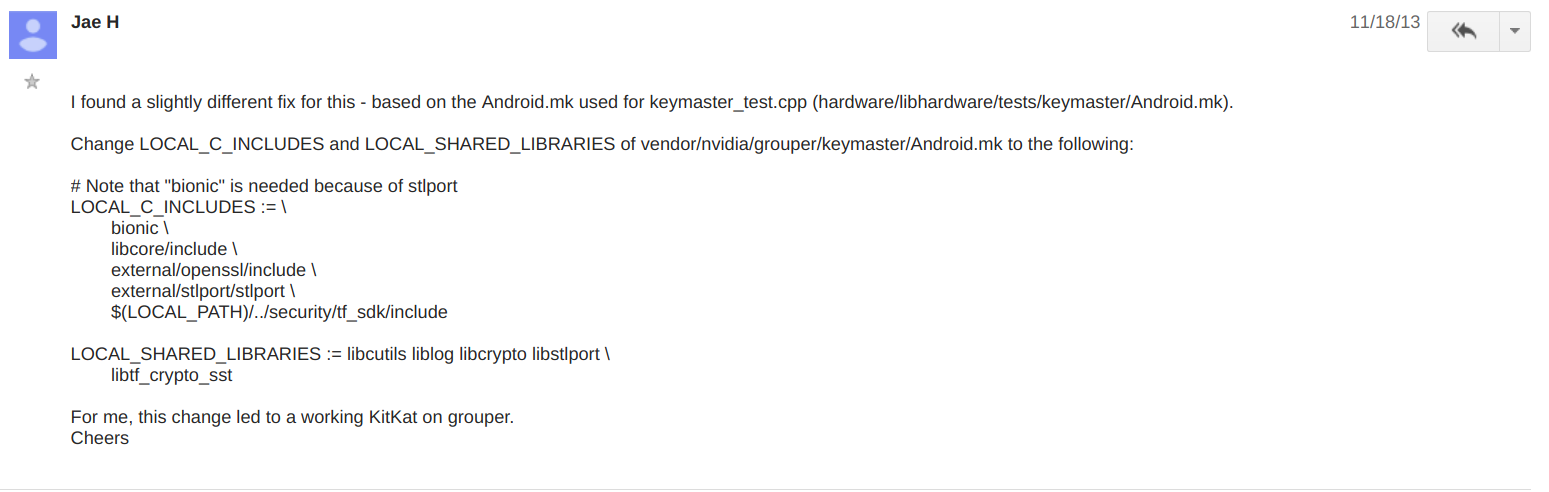
There will be a build error related to “uniqueptr” , and you have to rebuild again, so it is better to first apply the patch, follow this Stackoverflow post to patch this issue
ref: https://stackoverflow.com/questions/19186629/fatal-error-utils-uniqueptr-h-no-such-file-or-directory-error
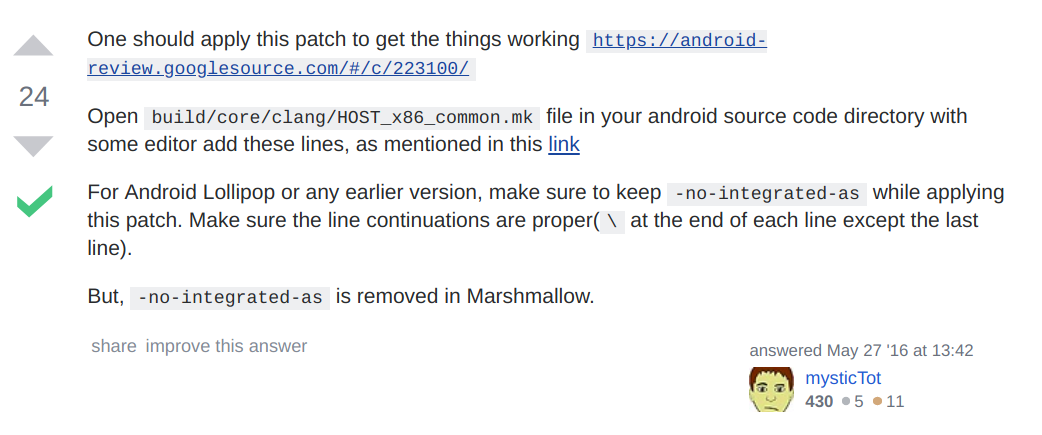
ref: https://stackoverflow.com/questions/36048358/building-android-from-sources-unsupported-reloc-43
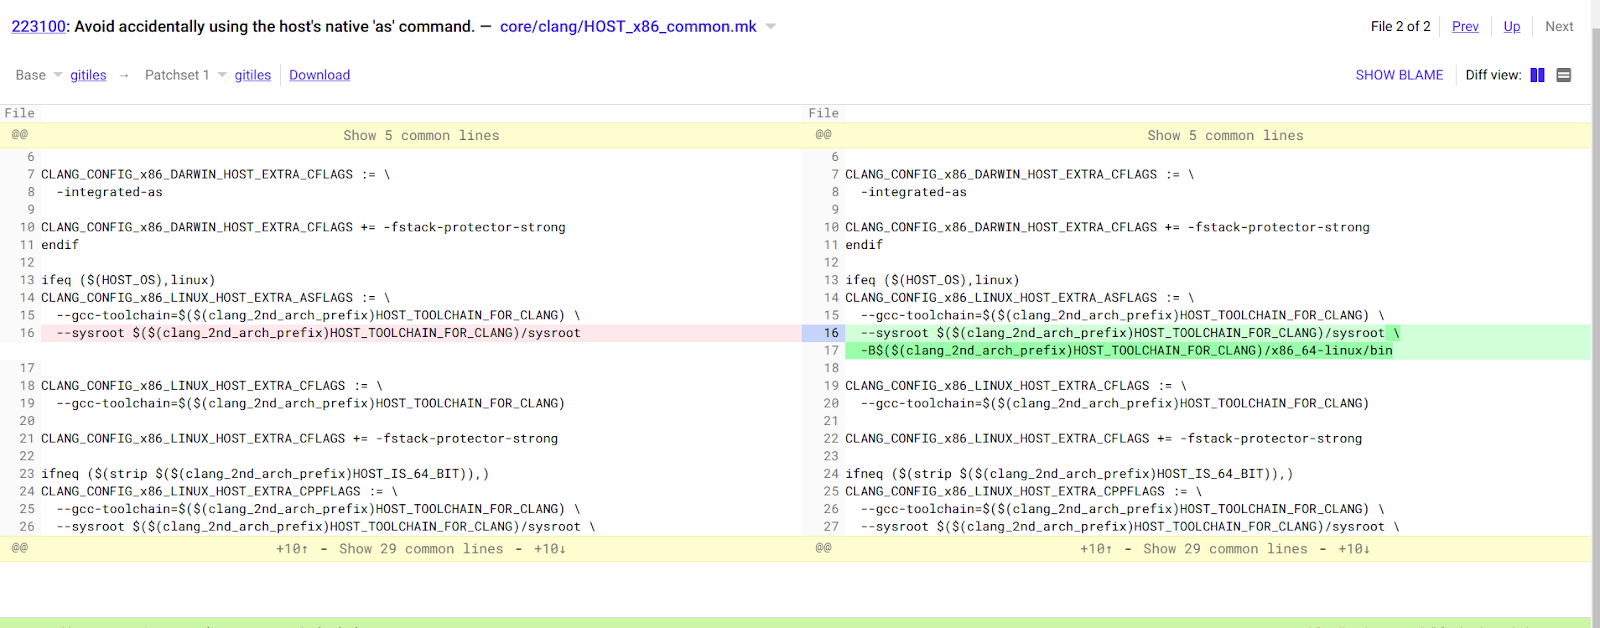
ref: https://groups.google.com/forum/#!topic/android-building/b66T0PzDIiM
> build
ayx@ayx-HP:~/aosp_work$ source build/envsetup.sh
ayx@ayx-HP:~/aosp_work$ lunch |
Choose “userdebug” option
ayx@ayx-HP:~/aosp_work$ make -j12 |
This build will use a prebuilt kernel from the vendor.
If everything is okay then the build will be successful
.png)