CMake Hands-On Tutorial
What is CMake
CMake is a cross-platform build system generator. Cmake is not a build system itself. It Generates another system's build files. After Generation, it can invoke native build environments such as Make to build the final executable / Libraries.
To use CMake, you create a CMakeLists.txt file in the root directory of your project and specify the source files, dependencies, and build options. CMake then generates a build system for your project based on the information provided in the CMakeLists.txt file. Let's have a short quick hands-on on its usage from scratch and later apply it to an advanced usage scenario with multiple source files. We would do that from the command line i.e without using any IDE so that we can learn the internals and Its working method more clearly
Basic usage
Let’s say we have the following sources


Here is a simple example of a CMakeLists.txt file that builds a hello world program:
cmake_minimum_required(VERSION 3.10) project(HelloWorld)
add_executable(hello main.c hello.c hello.h)
|
This CMakeLists.txt file specifies that a single executable, hello, should be built from the main.c source file. Save this file in the same directory

To build the project with CMake, you can use the following steps:
Create a build directory and navigate to it:
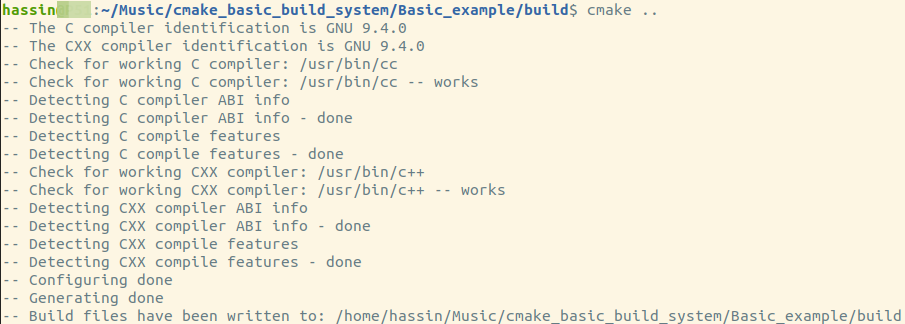
Run CMake to generate the build system:
This will generate the necessary makefiles or workspaces for your project.
This will create the makefile which you can use to build the project
Now Build the project:
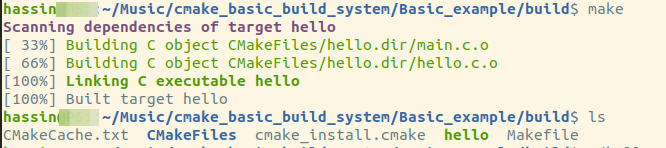
This will build the hello executable.

CMake also provides several advanced features, such as support for static and dynamic libraries, integration with testing frameworks, and the ability to generate project files for IDEs such as Visual Studio and Xcode.
Advanced Usage
Now let’s move on to a more complex project setup. We must learn this because CMake is mainly used for working with a very large codebase. This example although not very big but still larger than the basic example to demonstrate CMake's working method and it's benefits on Larger Codebase cases.
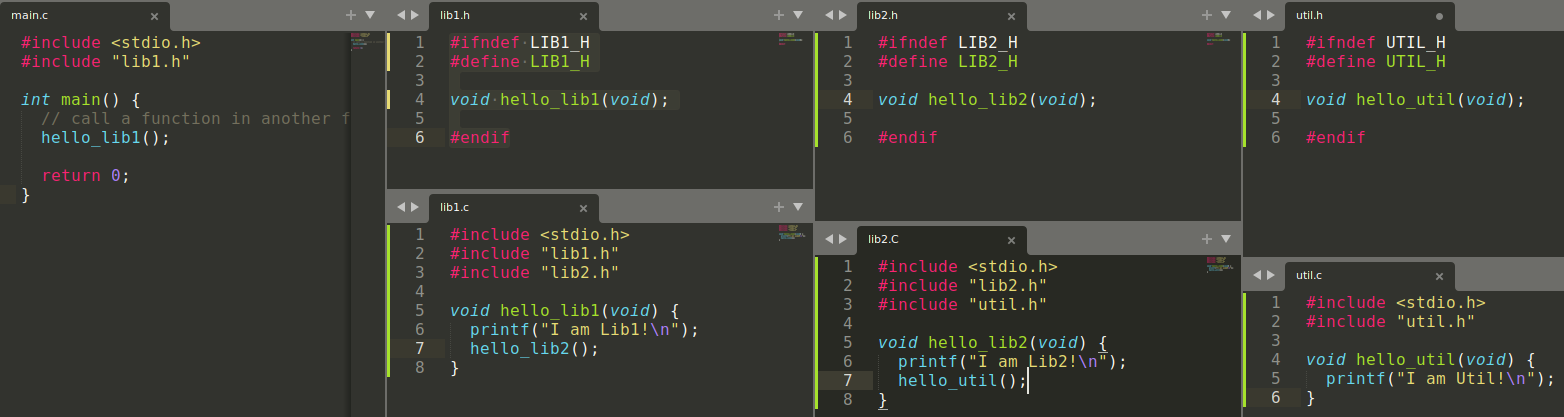
Let’s Say we have the following sources
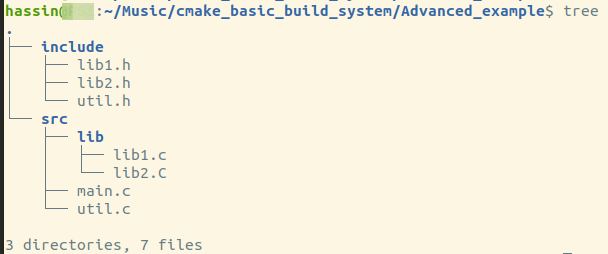
The sources look like the following
Create an empty CMakeLists.txt file and a build directory

The CMakeLists.txt file looks like the following
cmake_minimum_required(VERSION 3.10)
project(MyProject)
# Set some variables
set(EXECUTABLE_NAME myproject)
set(SOURCE_FILES src/main.c src/util.c src/lib/lib1.c src/lib/lib2.c)
# Enable C and C++ languages
enable_language(C CXX)
# Find and include header files
file(GLOB_RECURSE HEADER_FILES "include/*.h")
include_directories(${HEADER_FILES})
# Add an executable to be built from the source files
add_executable(${EXECUTABLE_NAME} ${SOURCE_FILES})
# Set compile definitions and include directories for the target
target_compile_definitions(${EXECUTABLE_NAME} PRIVATE MY_DEFINITION=1)
target_include_directories(${EXECUTABLE_NAME} PRIVATE include)
# Set compile and link options for the target
target_compile_options(${EXECUTABLE_NAME} PRIVATE -O2 -Wall -Wextra)
target_link_options(${EXECUTABLE_NAME} PRIVATE -lm -lpthread)
# Add a custom command to generate documentation
find_package(Doxygen)
if(DOXYGEN_FOUND)
add_custom_command(
OUTPUT ${CMAKE_CURRENT_BINARY_DIR}/docs
COMMAND ${DOXYGEN_EXECUTABLE} ${CMAKE_CURRENT_SOURCE_DIR}/Doxyfile
DEPENDS ${CMAKE_CURRENT_SOURCE_DIR}/Doxyfile
WORKING_DIRECTORY ${CMAKE_CURRENT_BINARY_DIR}
COMMENT "Generating API documentation with Doxygen"
)
add_custom_target(docs DEPENDS ${CMAKE_CURRENT_BINARY_DIR}/docs)
endif() |
Then run the cmake command like below and makefile will get generated

Then Run the make command to build the executable from the generated CMakeLists.txt

Then run the executable

Explanation (Step by Step)
Here is a brief explanation of each line in the CMakeLists.txt file that I provided in the example
cmake_minimum_required(VERSION 3.10) |
This line specifies the minimum version of CMake required to build the project. It ensures that the version of CMake being used is compatible with the commands and syntax used in the CMakeLists.txt file.
This line specifies the name of the project.
set(EXECUTABLE_NAME myproject)
set(SOURCE_FILES src/main.c src/util.c src/lib/lib1.c src/lib/lib2.c) |
These lines define two variables: EXECUTABLE_NAME and SOURCE_FILES. The EXECUTABLE_NAME variable specifies the name of the executable to be built, and the SOURCE_FILES variable specifies a list of source files that should be compiled to create the executable.
This line enables support for the C and C++ languages.
file(GLOB_RECURSE HEADER_FILES "include/*.h")
include_directories(${HEADER_FILES}) |
These lines use the file(GLOB_RECURSE) command to recursively search for header files in the include directory and store them in the HEADER_FILES variable. The include_directories command is then used to include these header files in the build.
add_executable(${EXECUTABLE_NAME} ${SOURCE_FILES}) |
This line adds an executable target to be built from the source files specified in the SOURCE_FILES variable. The executable will be named according to the value of the EXECUTABLE_NAME variable.
target_compile_definitions(${EXECUTABLE_NAME} PRIVATE MY_DEFINITION=1)
target_include_directories(${EXECUTABLE_NAME} PRIVATE include) |
These lines use the target_compile_definitions and target_include_directories commands to set compile definitions and include directories for the target, respectively. The PRIVATE keyword specifies that the definitions and include directories are only for the target and are not propagated to other targets that depend on it
target_compile_options(${EXECUTABLE_NAME} PRIVATE -O2 -Wall -Wextra)
target_link_options(${EXECUTABLE_NAME} PRIVATE -lm -lpthread) |
These lines use the target_compile_options and target_link_options commands to set compile and link options for the target, respectively. The PRIVATE keyword specifies that the options are only for the target and are not propagated to other targets that depend on it.
include_directories vs target_include_directories
include_directories is used to specify directories to be included in the build process for the entire project. It adds the specified directories to the included search path for all targets in the project.
On the other hand, target_include_directories are used to specify directories to be included in the build process for a specific target. It adds the specified directories to the included search path for a particular target, rather than for the entire project.
Here's an example of how you might use these two commands:
include_directories(common)
add_library(libA libA.cpp)
add_executable(appA appA.cpp)
target_include_directories(appA PRIVATE appA) |
In this example, the include_directories command specifies that the common directory should be included in the include search path for all targets in the project. The target_include_directories command specifies that the appA directory should be included in the include search path for the appA target only.
So, to summarize: include_directories is used to specify directories to be included in the include search path for the entire project, while target_include_directories is used to specify directories to be included in the include search path for a specific target.